Showing posts with label Light Project. Show all posts

Tuesday, 5 February 2013

Evaluation


1. Write an explanation of your brief - what did you have to do? How did you come up with the ideas for this project?

For this project the brief was to look at the theme of light and how it is used in different styles of photography. E.g. Use in portraits using different lighting such as professional studio lights or natural light etc. I first had to look at a range of different themes and photographers based around the main theme of light. I also tried many experiments in the styles of different light photographers to see if I liked any and if they were successful enough to expand and develop the idea. Once looking at a range of different photographers and trying out a lot of experiments with light such as portraits and light paintings, I then had to choose a pathway in which I wanted to develop. I chose Architecture and portraits. I came up with my ideas by then creating mind maps and mood boards.  


2. Write about the creative 'journey' of the project - how did the project and ideas evolve from start to finish through experimentation and research?

I first started of looking at a bunch of different photographers and analysing there work and ways in which they use light. I then tried lots of different experiments with light such and digital light paintings, experiments with film (still life and portraits), light experiments in photoshop (layer blending and photo filters) etc. I then chose the pathway of architecture and portraits. Firstly I was stuck, because I had many ideas but some were not possible at the time, I then started to look at a well known artist called JR. I started to research his work because he blends the two themes of architecture and portraits that  I chose for my pathway. I then started to brainstorm and experiment in photoshop. I had an idea that I could use photoshop to overlay my images onto one another so that the portrait photograph would look like it was actually stuck onto the building in real life and that the whole photograph would look like one and not just two separate photos. This was my first quick JR experiment: 


Once I had this idea I then wanted to develop it further and wanted to add another element of light into the idea. I then started to look at more of JR's work and more light photographers. I then found a project of JR's called 'The Wrinkles Of The City'. In some of the photographs from this project JR also used light motion blur from traffic in the bottom of his photographs. E.g: 


I really liked this and wanted to experiment with motion blur and try to blend it in with my idea of layer blending. I then started to take some of my own motion blur images and also then looked at a light photographer called Erik Kerstenbeck. This was an artist that I looked at in the everyday project but didn't develop my idea any further. I really liked Erik Kerstenbeck's motion blur work and he really inspired me for when looking at motion blur. Examples of his work: 

After experimenting a lot with motion blur in three different locations and also taking some portrait photographs I then picked out my best photographs and started to experiment a lot with lots of different tools and layer blending options in photoshop to try and get the most realistic look from my outcomes. I ended up using the perspective and warp tool and using hard light and overlay layer options to get the best effect in photoshop. 
  

3. Who inspired your final outcomes? - You MUST talk about who has inspired your work - include images and links where possible. 

JR and Erik Kerstenbeck are the two main artist that really inspired me in my creative journey to help me create my final outcomes. Jr's 'The Wrinkles of the City' project first inspired me to take my own portrait and architectural photographs and then use layer blending techniques on photoshop to try and make the two photographs look like one. I then also saw a photograph of JR's work with with a nice light motion blur from a car at the bottom of the image. This inspired me to look more into motion blur as it really linked well with light project. When looking at motion blur photographers Erik Kerstenbeck really inspired me and I really liked his work.   

4. What do you think you have done well? What has worked? Are you happy with your final outcomes?

I really feel that my layer blending techniques I used to layer my portraits onto my architectural motion blur photographs worked really well as I developed my ideas a lot using different tools like perspective and warp in photoshop.


5. What do you think you could have improved in your final outcome? - you need to talk about something, nobody is perfect!

I feel that I could've visited lots more locations with more variety of architecture if I had more time because I only used two locations in my final outcomes. I also feel that even though I was happy with my portraits i feel that i could of set up a photo shoot sand taken these much more professionally.

6. Conclusion - overall how did you find the project? What techniques would you like to develop further in the future?


I found this project really exiting as I got to develop my digital photography skills a lot and I would like to develop my skills more in digital photography. I really enjoyed developing my skills and understandings in the subject of motion blur and feel that I am going to experiment more with motion blur and try to involve it more into some of my digital photographs. I also really enjoyed experimenting with light painting and feel that I am going to also experiment more with this as I found it really fun and fascinating.


Tuesday, 29 January 2013

My Final Outcomes


Erik Kerstenbeck's Motion Blur Work:


JR's Motion Blur Work:


Friday, 25 January 2013

Jr Experiments


Jr Experiments

Once I had experimented a lot with my other image I then wanted to experiment more with my motion blur images I took in London. I chose this image because I really liked the blur of the bus and the lighting of the houses of parliament behind the motion light blur.


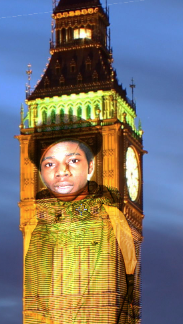
I firstly chose this image that took of my friend and wanted to use it to layer onto big ben just like I used my other portraits to layer onto the buildings on my first motion blur photograph taken in croydon.
I used the layer setting 'hard light' instead of overlay because it looked more realistic like the portrait had been placed on big ben, like JR's work. I then used the perspective tool and placed the portrait neatly onto the building, I really like how I used the perspective tool to place the subject onto big ben as it looks like the portrait is wrapped around.   


I also tried experimenting with different placements of the portrait onto different areas of big ben.
I did not like this placement of the subjects face on big ben ben as I really liked the lighting of big ben on top and I felt that the placement of the portrait was much better underneath the clock.  


I also tried adding more portraits behind the motion blur of the bus on the side of the houses of parliament. I did not like this experiment because I felt they looked too small and didn't look very realistic on the building.

This is my final outcome:


Friday, 18 January 2013

Jr Inspired Experiment


Once I had taken more motion blur photographs I then chose to experiment and develop my JR inspired  idea. I chose this photograph that I took because of the 3 flat buildings that are in the background so that I could overlay my portrait photographs onto the buildings. I also really like this image because of the smooth light blur from the bus that is at the bottom of the photograph. This is my first JR inspired experiment that I have tried with this image and plan to develop this idea further by taking 3 separate portraits to go on each building. I do like this image but feel that I need to perfect it more and think about placements of the portraits on the buildings so that the portraits don't have sharp edges and fit perfectly on the buildings.

Thursday, 17 January 2013

My Trip To London

I went to London to take more photographs of motion blur. I chose London because I wanted somewhere where there was a lot of buses for the best light blur effect to be in the foreground and also somewhere where there was nice buildings and landscapes in the background. 
For these experiments I used a Canon 550D with a 18-55mm lens. I also used a tripod so that I could keep the camera steady when using long shutter speeds. 


Shutter Speed: 20 Seconds, F-Stop: 36, ISO: 100
This was my first motion blur experiment of a water feature in central london. I took this photo whilst I was waiting for it to get much darker so that I could get the best light blur of cars and buses.

From the big selection of photographs I took in london I felt that these were my best photographs of motion blur that I took. 


Tuesday, 15 January 2013

Erik Kerstenbeck


Erik Kerstenbeck is a San Diego photographer who describes himself as edgy, creative and unique. He is also the co-owner of Kerstenbeck Photographic Art. Erik has been self studying photography for 30+ years starting with an old Brownie Box Camera. He thrives himself in all aspects of  Light, Composition, Technical aspects of equipment and Post Processing Techniques.


In the first unit 'the everyday project' I did look at Erik Kerstenbeck's work and did have an idea to try and experiment with shutter speed to try and take my own motion blur photography. In this unit I did not develop my idea any further and ended up experimenting more with photograms. I have now decided to look at Erik Kerstenbecks work again more in-depth as now motion blur photography is much more relevant to my work as  this whole unit is about light.


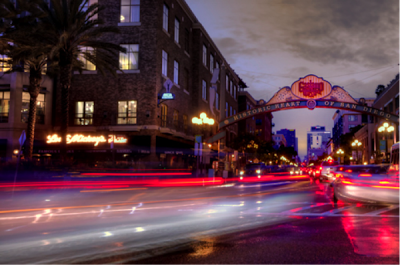
Erik Kerstenbeck tutorials on his websites have helped me in choosing the right settings for my camera for when taking photographs of motion blur. I really like Kerstenbecks Motion Blur light photography work because of what he includes in the frame, for example I really like how he merges the two ideas of architecture of the Flatiron building and motion blur of the cars and taxis in this photograph (on the left). 
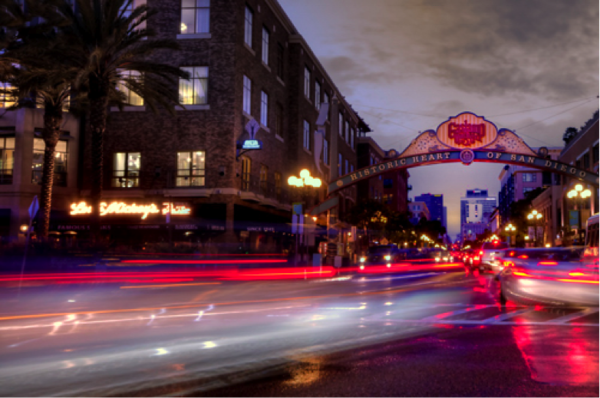
I also really like the different reflections and blur of light in the photograph of 'San Diego’s Gaslamp Quarter' (at the top of blog post). "Another nice thing to consider is rain, I waited until the streets were soaked before shooting this to get added reflections of the city lights."- Erik Kerstenbeck.
When taking more photographs of light motion blur I am going to consider experimenting with architecture in the background of my photos and also try to experiment with light reflections from rain or even streams or rivers. 

Friday, 11 January 2013

How to use a 35mm SLR Camera.


More Motion Blur Experiments

These are some more test experiments on trying to get the best camera settings for when taking photographs of motion blur. To improve my motion blur photographs I need to find better locations in which there are nice architectural landscapes in the background and where there is not to much traffic so I can try and capture the light blur of one or two vehicles in each shot.
When Experimenting with different exposure timings and trying to get the right light blur I have found that the best blur from vehicles is when they are going at fast speeds and there is less traffic. This gives the best blur effect in the picture because the beams of lights are really smooth and detailed. 
The camera settings for these three photographs were: 4 second shutter speed, F-Stop: 4, ISO: 100.
All taken with a Canon EOS 550D with a Canon EF-S 18-55mm lens and mounted on a Tripod. 


Motion Blur & Architectural Experiments

These are my first experiments of motion blur taken with a Canon EOS 550D with a Canon EF-S 18-55mm lens without a tripod.


This was one of my first photograph that I took experimenting with shutter speed.
I first found a good spot where different vehicles were driving past at high speeds. I then made sure there was a good flat surface for my camera to rest on so that when the shutter was open I didn't get any blur on my photos other than the blur of the lights on the vehicles.
   I then chose to set my camera to the 'TV' setting, so all I had to do was change the shutter speed and the F-Stop and ISO would be chosen automatically. I set the shutter speed to 5 seconds because I felt that this would hopefully just capture one vehicle as it went passed. These are the other settings which the camera chose automatically: F-stop: 7.1, ISO: 100. 
I really like this photo because I pressed the shutter perfectly when a bus was going at full speed, because the bus was going at full speed in a straight line the light blur from the bus is really smooth.


  5 Second Shutter Speed, F-Stop:8, ISO: 100. 
This was then one of my other motion blur photograph which I am really proud of because of the smooth blur of the tram. For this Photograph the camera settings were pretty much similar other than the camera had chosen to make the F-Stop a bit higher. I feel that this changed because I was in a different location where there was much more light coming from East Croydon station.           


10 second shutter speed, F-Stop: 10, ISO: 100. 
I really like the light blur in the photo of the bus but feel that I should of chosen a different location as the lamp post is in the centre of the photo. 


6 Second Shutter Speed, F-Stop: 8, ISO: 100.


1/20 Shutter Speed, F-Stop: 4, ISO: 3200.
I really like this because of how the bus has past as I was taking the photograph of the 50p building, I am now going to try and use this effect to take photographs of motion blur with architecture in the background. To do this I feel that I will need a tripod so that I can point the camera at different angles to be able to capture the best frames. 


1/20 Shutter Speed, F-Stop: 3.5, ISO: 3200.


1/20 Shutter Speed, F-Stop: 5, ISO: 3200.


1/20 Shutter Speed, F-Stop: 3.5, ISO: 3200.

Sunday, 6 January 2013

Jr Inspired Experiments


For this first experiment I used a photograph off google of this rundown building and then inserted one of my Slr portrait photographs and used the magic wand tool to crop the image. I then changed the opacity of the portrait image. I do like this technique and feel that I should experiment more with trying to overlay images using the layer blending modes.


This is my second JR inspired experiment. For this experiment I used a technique called layer masking. Layer masking is when you use two separate layers and you basically paint on the layer in the background onto the layer in the foreground. This is done by erasing parts of the image in the foreground. Once I had my foreground portrait picture in the right position I then used linear light to make the layers blend, to look like the portrait image is part of the background photograph.